Sourdough Starter in 7 Days: Foolproof Method That Works

The first time a jar on your counter sighs out a sour, yeasty breath after you stir it, you will feel like you pulled off a small magic trick. Flour and water turn into something alive, stretchy, and crowded with tiny bubbles. It smells like warm bread dough and green apples, and nothing else in baking feels quite like it.
This sourdough starter recipe uses a seven day schedule built on exact weights, simple daily steps, and clear signs that tell you what to do next. You only need about five minutes a day and two ingredients. Most jars become active within a week, though cooler kitchens can need a few extra days, and I will show you how to tell the difference. By the end, you will have a strong sourdough starter ready for bread, pancakes, pizza dough, and more. No prior baking experience is needed, and the flour is easy to find.
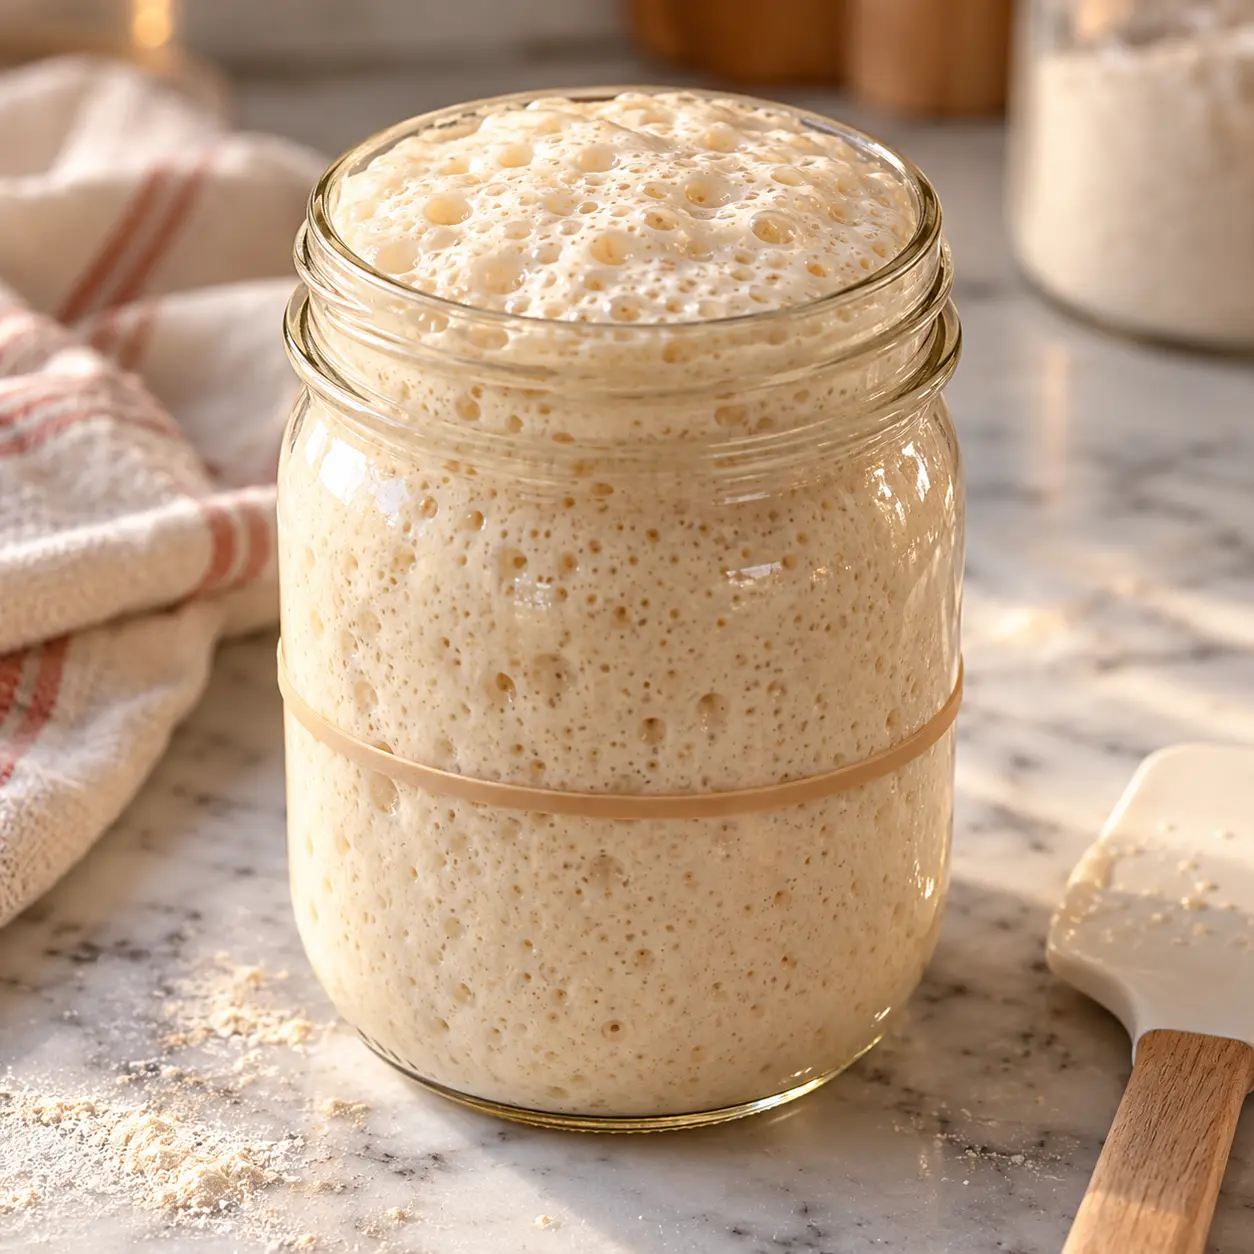
[AI IMAGE PROMPT: Bubbly cream colored sourdough starter filling a wide mouth glass mason jar to its rubber band marker, domed top covered in tiny glossy bubbles, resting on a white marble table beside a white ceramic spatula, warm kitchen light, wisp of flour dust on the marble, 45 degree food photography angle.]
[IMAGE PLACEHOLDER: alt text: “Bubbly sourdough starter in a glass jar with a rubber band marking its rise” | filename: “sourdough-starter-bubbly-jar-hero.jpg” | orientation: vertical, 2:3 ratio (1000x1500px)]
Why You’ll Love This Sourdough Starter Recipe
- Only two ingredients. Flour and water are all you need, so there is nothing to hunt for or pay extra for.
- Exact weights. Grams remove the guesswork, which is where most failed jars begin.
- Five minutes a day. Each feeding is a quick stir and a fresh scoop of flour, so it fits around work and family.
- Clear daily checkpoints. Every day lists what you should see and smell, so you always know whether the jar is on track.
- A starter that keeps going. Once active, it lives in your fridge and needs feeding only about once a week.
- Little waste. The discard from each feeding turns into pancakes, crackers, and waffles.
Ingredient Selection Tips
Choose unbleached flour every time, because bleaching can slow the microbes you are trying to grow. Whole wheat or rye flour works best on day one since the bran carries extra nutrients that wake up fermentation. Smell the bag before you buy a large size: fresh flour smells mild and slightly sweet, never musty or bitter. For water, use filtered or let tap water sit out for a few hours, since heavy chlorine can hold back a young starter.
Pro Tip: Buy one 2 kg (about 4½ lb) bag of unbleached bread flour and a small bag of whole wheat flour. That covers the whole seven days with flour left over for your first loaf.
Recipe Snapshot
| Servings | Difficulty | Course | Cuisine | Prep Time | Cook Time | Rest Time | Total Time | Calories |
| About 1 cup (250 g) active starter | Easy | Baking Basics | Artisan Baking | 5 minutes | 0 minutes | 7 days | 7 days 5 minutes | About 90 per 50 g |
Ingredients for Sourdough Starter
For day one:
- 60 g (about ½ cup) whole wheat flour. The bran brings nutrients that give early fermentation a boost.
- 60 g (¼ cup) lukewarm filtered water, around 80°F (27°C). Warm water speeds up the yeast, while chlorine can slow it down.
For daily feedings, days 3 to 7:
- About 450 g (3½ cups) unbleached bread flour in total, 50 g per feeding. Its higher protein builds a stronger, stretchier starter over time. Unbleached all purpose flour works too, with a slightly slower rise.
- About 450 g (2 cups) lukewarm filtered water in total, 50 g per feeding at 80°F (27°C).
Substitution notes: Swap whole wheat for rye on day one if you like a tangier flavor. Use any unbleached flour for later feedings if bread flour is not on hand.
Recipe Timing
Your active work is tiny. Day one takes about five minutes, and each of the nine feedings after that takes around three, so you spend roughly 35 to 40 minutes of real work across the whole week. The rest is waiting. Plan on seven days to reach an active jar, and keep ten days in mind if your kitchen sits below 70°F (21°C).
[AI IMAGE PROMPT: Raw ingredients for sourdough starter: pale powdery whole wheat flour mounded in a white ceramic bowl, filtered water in a glass measuring jug, and a digital kitchen scale, arranged on a white marble table, soft natural daylight, scattered flour grains, top down flat lay.]
[IMAGE PLACEHOLDER: alt text: “Whole wheat flour, filtered water, and kitchen scale on white marble for sourdough starter” | filename: “sourdough-starter-ingredients-flatlay.jpg” | orientation: horizontal]
Allergen & Dietary Disclosure
This recipe contains gluten (wheat flour). To avoid it, build a starter from brown rice flour and water on the same schedule, though the rise will be gentler and the texture looser. Severe wheat allergy and celiac disease need extra care, since cross contact from tools, jars, and surfaces is possible. Please check with your doctor before using any recipe, because this one is not guaranteed safe for any specific allergy.
Equipment Needed
- Wide mouth glass jar, about 1 liter (1 quart). Straight sides make the rise easy to read.
- Digital kitchen scale. Weighing in grams keeps every feeding consistent.
- Silicone spatula. It scrapes the sides, so dried bits do not collect above the starter.
- Rubber band or tape. Mark the level after each feeding to measure the rise.
- Breathable cover. A coffee filter with a band, a cloth, or a loosely set lid lets gas escape.
- Instant read thermometer (optional). It checks your water temperature and your jar’s spot in the kitchen.
Preparation
Wash the jar with hot, soapy water and rinse it well so no soap film stays behind. Let it cool to room temperature. Find a draft free spot that stays around 75 to 80°F (24 to 27°C), such as near a warm appliance or inside a cold oven with only the light on. Write today’s date on a strip of tape for the jar. Have your flour, filtered water, scale, and spatula within reach, since every feeding goes faster with everything in one place.
Step by Step Instructions
Step 1: Mix the First Batch (Day 1)
Place the jar on the scale, zero it, and add 60 g whole wheat flour and 60 g water at 80°F (27°C). Stir until no dry flour remains and the paste looks like thick pancake batter. Rest a loose cover on top and leave the jar in its warm spot for 24 hours.
Chef’s Note: A loose cover lets gas escape and keeps dust out. Scrape the sides down so nothing dries into a crust.
Step 2: Stir and Wait (Day 2)
Stir the mixture once, about 24 hours after mixing. You may see a few bubbles or nothing at all, and both are normal. Cover again and wait another 24 hours.
[AI IMAGE PROMPT: Hand stirring thick, pasty whole wheat flour and water batter in a wide mouth glass jar with a white silicone spatula, creamy beige texture clinging to the glass, white marble table, warm kitchen light, dusting of flour, 45 degree food photography angle.]
[IMAGE PLACEHOLDER: alt text: “Stirring thick whole wheat sourdough starter batter in a glass jar with a spatula” | filename: “sourdough-starter-day-one-mixing.jpg” | orientation: horizontal]
Step 3: Discard and Feed for the First Time (Day 3)
Keep 50 g of the mixture and discard the rest. Stir in 50 g bread flour and 50 g water at 80°F (27°C), then slide a rubber band to mark the new level. By now you should see small bubbles and notice a mild sour smell.
Chef’s Note: Discarding keeps the amount of food per microbe high, so the jar does not run out of flour and turn sluggish. If you spot pink or orange streaks or fuzzy mold, throw the whole jar away and start over.
Step 4: Feed Twice a Day (Days 4 and 5)
Repeat the same discard and feed every 12 hours, for example at 8 am and 8 pm. Look for bubbles on the surface and through the glass, and a rise of roughly 25 to 50 percent within 6 hours. If activity dips on day 4 or 5, keep going on schedule.
Chef’s Note: A short slump is common as different microbes take turns dominating. Regular feeding carries the jar through it.
[AI IMAGE PROMPT: Hand folding unbleached bread flour and water into a spoonful of old starter inside a wide mouth glass mason jar, thick glossy paste with trapped bubbles and flecks of bran, white marble table, warm kitchen light, flour dusting, top down angle.]
[IMAGE PLACEHOLDER: alt text: “Feeding sourdough starter with bread flour and water in a glass mason jar” | filename: “sourdough-starter-feeding-step.jpg” | orientation: horizontal]
Step 5: Watch the Rise (Day 6)
Feed on the same twice daily schedule and check the rubber band 4 to 8 hours later. A healthy jar climbs close to double its starting height and smells tangy, like yogurt or green apple. If it grows by only half, keep feeding twice a day for a few more days.
Step 6: Run the Readiness Test (Day 7)
Feed the jar, mark the level, and watch it for 4 to 8 hours. Your sourdough starter is ready when it doubles in that window, shows a domed top, and looks webbed with bubbles when you stir it. Wait for two feedings in a row with this behavior before you bake.
Chef’s Note: Rely on the rise rather than the float test. A floating spoonful can still come from a starter that is not strong enough to lift a loaf.
[AI IMAGE PROMPT: Side view of a glass mason jar of bubbly, stringy sourdough starter with a rubber band marking its rise, honeycomb bubbles visible against the glass, white marble table, soft natural daylight, white ceramic spoon resting nearby, eye level camera angle.]
[IMAGE PLACEHOLDER: alt text: “Active sourdough starter doubled in a glass jar with honeycomb bubbles” | filename: “sourdough-starter-doubled-in-jar.jpg” | orientation: vertical, 2:3 ratio (1000x1500px)]
Step 7: Bake or Store
Use the starter at its peak, which falls 4 to 8 hours after feeding, or cap the jar loosely and move it to the fridge. Keep a bit of starter back every time you bake so you never use it all.
Expert Tips & Tricks
- Weigh everything. A cup of flour can vary by 30 g or more, which changes the thickness of your starter and how fast it rises.
- My early mistake. I once fed a young jar with water straight from a hot tap, around 115°F (46°C). It went flat for two days. Use lukewarm water, roughly 80°F (27°C).
- Make ahead. Feed your starter the night before baking day, then use it at its peak the next morning.
- Storage tip. Pick a jar twice the volume of your starter so there is room to rise without overflowing.
- Texture check. Aim for thick pancake batter. If it feels stiff, add 5 to 10 g more water at the next feeding.
- Save time. Keep a covered container of discard in the fridge and use it for pancakes, waffles, and crackers throughout the week.
Common Mistakes & Troubleshooting
| Problem | Why It Happens | How to Fix or Prevent It |
| No bubbles by day 4 | The kitchen is too cool or the water is chlorinated | Move the jar to 75 to 80°F (24 to 27°C) and switch to filtered water |
| Smell like nail polish | The starter is hungry and producing acetone | Feed more often, and discard a bit more before feeding |
| Gray liquid on top | Hooch forms when yeast runs out of food | Pour it off or stir it in, then feed right away |
| Rises then collapses | The peak passed before you checked | Mark the level and check earlier, around the 4 hour point |
| Flat after one hot water feeding | Water above 100°F (38°C) stressed the yeast, as it did in my jar | Use lukewarm water and feed again on schedule |
Storage, Reheating, Freezing, Make-Ahead
Counter
Feed once a day at room temperature if you bake often. Keep it loosely covered.
Refrigerator
Store the jar in the fridge with a loose lid for up to 2 weeks between feedings, though a weekly feeding keeps it strongest. Label the lid with the last feeding date, which is the tip I use most.
Reviving After the Fridge
Take the jar out, let it warm for about an hour, then feed it 1:1:1 by weight (starter, flour, water). Repeat once or twice at 12 hour gaps until it doubles in 4 to 8 hours.
Freezer
Freeze spoonfuls in an airtight container for up to 3 to 4 months. Thaw in the fridge overnight, then revive with a few feedings.
Dried Backup
Spread a thin layer on parchment, let it dry for a couple of days, crumble it into flakes, and store in a sealed jar for up to a year. Rehydrate with equal weights of flour and water.
Make Ahead
Build your starter a week before your first baking day so it has time to settle into a steady rhythm.
[AI IMAGE PROMPT: Wide mouth glass mason jar of chilled sourdough starter with a loose white ceramic lid and a neat white paper label, smooth creamy texture with fine bubbles, white marble table, soft natural daylight, sprinkle of flour on the marble, 45 degree angle.]
[IMAGE PLACEHOLDER: alt text: “Labeled jar of sourdough starter stored with a loose lid” | filename: “sourdough-starter-storage-jar-labeled.jpg” | orientation: horizontal]
Variations & Substitutions
- Rye starter. Replace the whole wheat with dark rye flour for a faster start and a tangier, earthier flavor.
- Whole wheat starter. Use whole wheat for every feeding to get a nuttier jar that ferments quickly.
- Pineapple juice method. Swap the water for unsweetened pineapple juice on days 1 and 2 to add early acidity, then return to plain water.
- Stiff starter. Use 25 g water to 50 g flour for a dough like starter that ferments slower and tastes milder.
- Gluten free starter. Feed brown rice flour and water on the same schedule for a gluten free jar.
Serving Suggestions
- Bake a country loaf, using [INTERNAL LINK: beginner sourdough bread recipe].
- Fluffy morning pancakes made with leftover discard and [INTERNAL LINK: sourdough discard pancakes].
- Crisp crackers from stored discard, as in [INTERNAL LINK: sourdough discard crackers].
- Homemade pizza dough with a chewy, blistered crust.
- Warm waffles topped with fresh fruit and yogurt.
- A pot of tea or hot chocolate alongside fresh sourdough toast.
Why This Recipe Works
A sourdough starter is a community of wild yeast and lactic acid bacteria living in flour and water. Flour carries these microbes naturally, and each feeding gives them fresh food to multiply. As they grow, the bacteria produce acids that lower the pH of the jar, which helps keep unwanted microbes out while giving sourdough its tang.
Warmth sets the pace. Yeast and bacteria work faster between 75 and 80°F (24 to 27°C), so a warm spot shortens the week, while a cool kitchen stretches it. Whole wheat flour on day one helps because the bran offers extra nutrients that kick-start early activity.
A 1:1:1 feeding ratio by weight gives the jar enough food without diluting it too far. Discarding before each feeding keeps the population strong and prevents acids from building up so much that growth slows.
Frequently Asked Questions
FAQ source note: These questions follow typical question patterns seen around sourdough starter searches. Live search was not used.
How long does it take to make a sourdough starter?
Most sourdough starters become active in 7 to 10 days, though a cool kitchen can stretch that to 14. Judge readiness by behavior, not the calendar. Your starter is ready when it doubles within 4 to 8 hours after a feeding, for two feedings in a row, with a domed top, many bubbles, and a tangy smell. If it falls short on day 7, keep feeding twice a day and check again every 24 hours.
Why is my sourdough starter not bubbling?
Cold temperature is the most common reason. Yeast slows down sharply below 70°F (21°C), so move the jar to a warmer spot such as the top of the fridge or an oven with only the light on. Chlorinated tap water and bleached flour can also hold things back. Switch to filtered water, use unbleached flour, and add a spoonful of whole wheat or rye to each feeding for two or three days.
Can I use all purpose flour to make a sourdough starter?
Yes, but expect a slower start. Unbleached all purpose flour works well after the first two days, as long as the label says unbleached. Whole wheat or rye gives the young starter more nutrients and microbes, so using it for day one and a few early feedings helps. Bread flour makes a stronger, more elastic starter over time because of its higher protein.
How do I store sourdough starter if I only bake once a week?
Keep your sourdough starter in the fridge in a loosely covered jar and feed it once a week. Take it out the night before baking, let it warm for an hour, then feed it 1:1:1 by weight. It may need one or two feedings to peak. After that, it will be ready to bake within 4 to 8 hours of a feeding, so you can plan around your schedule.
Is the liquid on top of my sourdough starter bad?
No. The gray or dark liquid is called hooch, and it signals a hungry starter, not a spoiled one. Pour it off or stir it in, depending on how sour you like the flavor, then feed the jar right away. Throw the whole jar out if you see pink or orange streaks, fuzzy spots, or a smell like rotten food, since those point to contamination.
Can I make a sourdough starter if I have a gluten allergy or wheat sensitivity?
You can make a gluten free starter with brown rice flour and water, using the same daily schedule. Wash jars and tools well, because traces of wheat can carry gluten. Keep in mind that a regular wheat sourdough starter is not safe for celiac disease or wheat allergy, even after long fermentation. Check with your doctor if you are unsure.
[AI IMAGE PROMPT: Close up of active sourdough starter stretching from a white ceramic spoon in glossy elastic ribbons, airy honeycomb bubbles on the surface, wide mouth glass mason jar behind, white marble table, soft natural daylight, fine flour dust, macro camera angle.]
[IMAGE PLACEHOLDER: alt text: “Stretchy active sourdough starter lifted on a ceramic spoon” | filename: “sourdough-starter-stretchy-final-shot.jpg” | orientation: vertical, 2:3 ratio (1000x1500px)]
Conclusion
My first jar sat flat and sleepy for five days, and I nearly tossed it. Then one morning it had doubled, domed, and smelled like green apples, and I have fed one ever since.
Take your time, keep the jar warm, and watch the rise instead of the calendar. Once your sourdough starter is doubling on schedule, the best thing you can do is bake with it, even if the first loaf is not pretty. A healthy jar forgives a lot. Skip a feeding, bake a day late, or leave it in the fridge for a week, and it will bounce back.
If you loved this recipe, save it to your sourdough baking Pinterest board so you can find it easily later!
Sourdough Starter in 7 Days
Ingredients
Method
- Instructions:
- Weigh the whole wheat flour and water into a clean jar, stir into a thick paste, cover loosely, and leave in a warm spot for 24 hours.
- On day two, give the mixture one stir, then cover it and wait another 24 hours.
- On day three, keep 50 g of the mixture, discard the rest, then stir in 50 g bread flour and 50 g water. Mark the level.
- For days four and five, repeat the discard and feed every 12 hours until you see regular bubbles and a modest rise.
- On day six, continue the twice daily routine and check for a rise close to double within 4 to 8 hours.
- On day seven, feed the jar and watch the rubber band. When it doubles twice in a row with a domed, bubbly top, it is ready to bake.
- Use at its peak or store in the fridge with a loose lid.
Notes
- Use unbleached flour and filtered water for the strongest start.
- Keep the jar at 75 to 80°F (24 to 27°C) for the fastest results.
- Refrigerate with a loose lid and feed weekly.
- Discard the jar if you see pink or orange streaks or fuzzy mold.